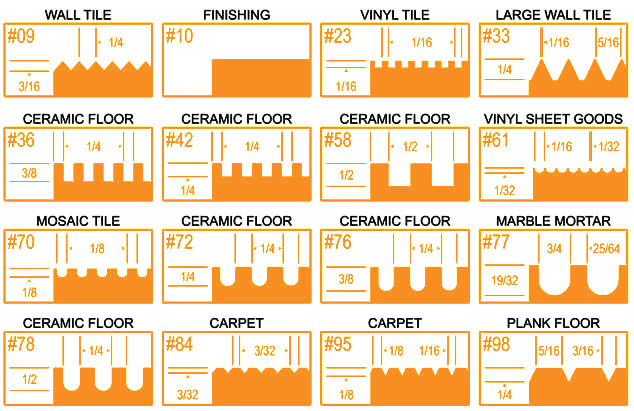
If you're in the tile business, you're surely aware that tile installation requires specific mortar coverage - 80% in dry areas and 95% in wet and exterior areas. The question is: which trowel notch works best for your installation?
With the ever-growing size of tiles in the marketplace, selecting the right trowel has become more important than ever. For example, a 3/16-inch V-notch trowel provides excellent coverage for small wall tiles up to 4-1/2 inches, while large format tiles like 12x24 need a ½" x ½" trowel to achieve the ANSI A108 requirement.
Let's further explore how to select the trowel that will provide enough mortar to properly bond the tile to the substrate while meeting these critical coverage requirements.

What is a Tile Trowel Size Chart
A tile trowel size chart helps you choose the right trowel size based on tile dimensions and notch spacing. The size of the notches determines how much mortar is applied to ensure tiles adhere securely. Larger tiles need deeper notches for better coverage, while smaller tiles require finer notches for precision. This chart is essential for achieving the best tile installation results.
Understanding Trowel Basics
The success of tile installation depends on a trowel's design through three elements: notch shape, size, and proper usage. These components work together to achieve the required mortar coverage of 85% for dry areas and 95% for wet areas.
Types of Notches and Their Functions
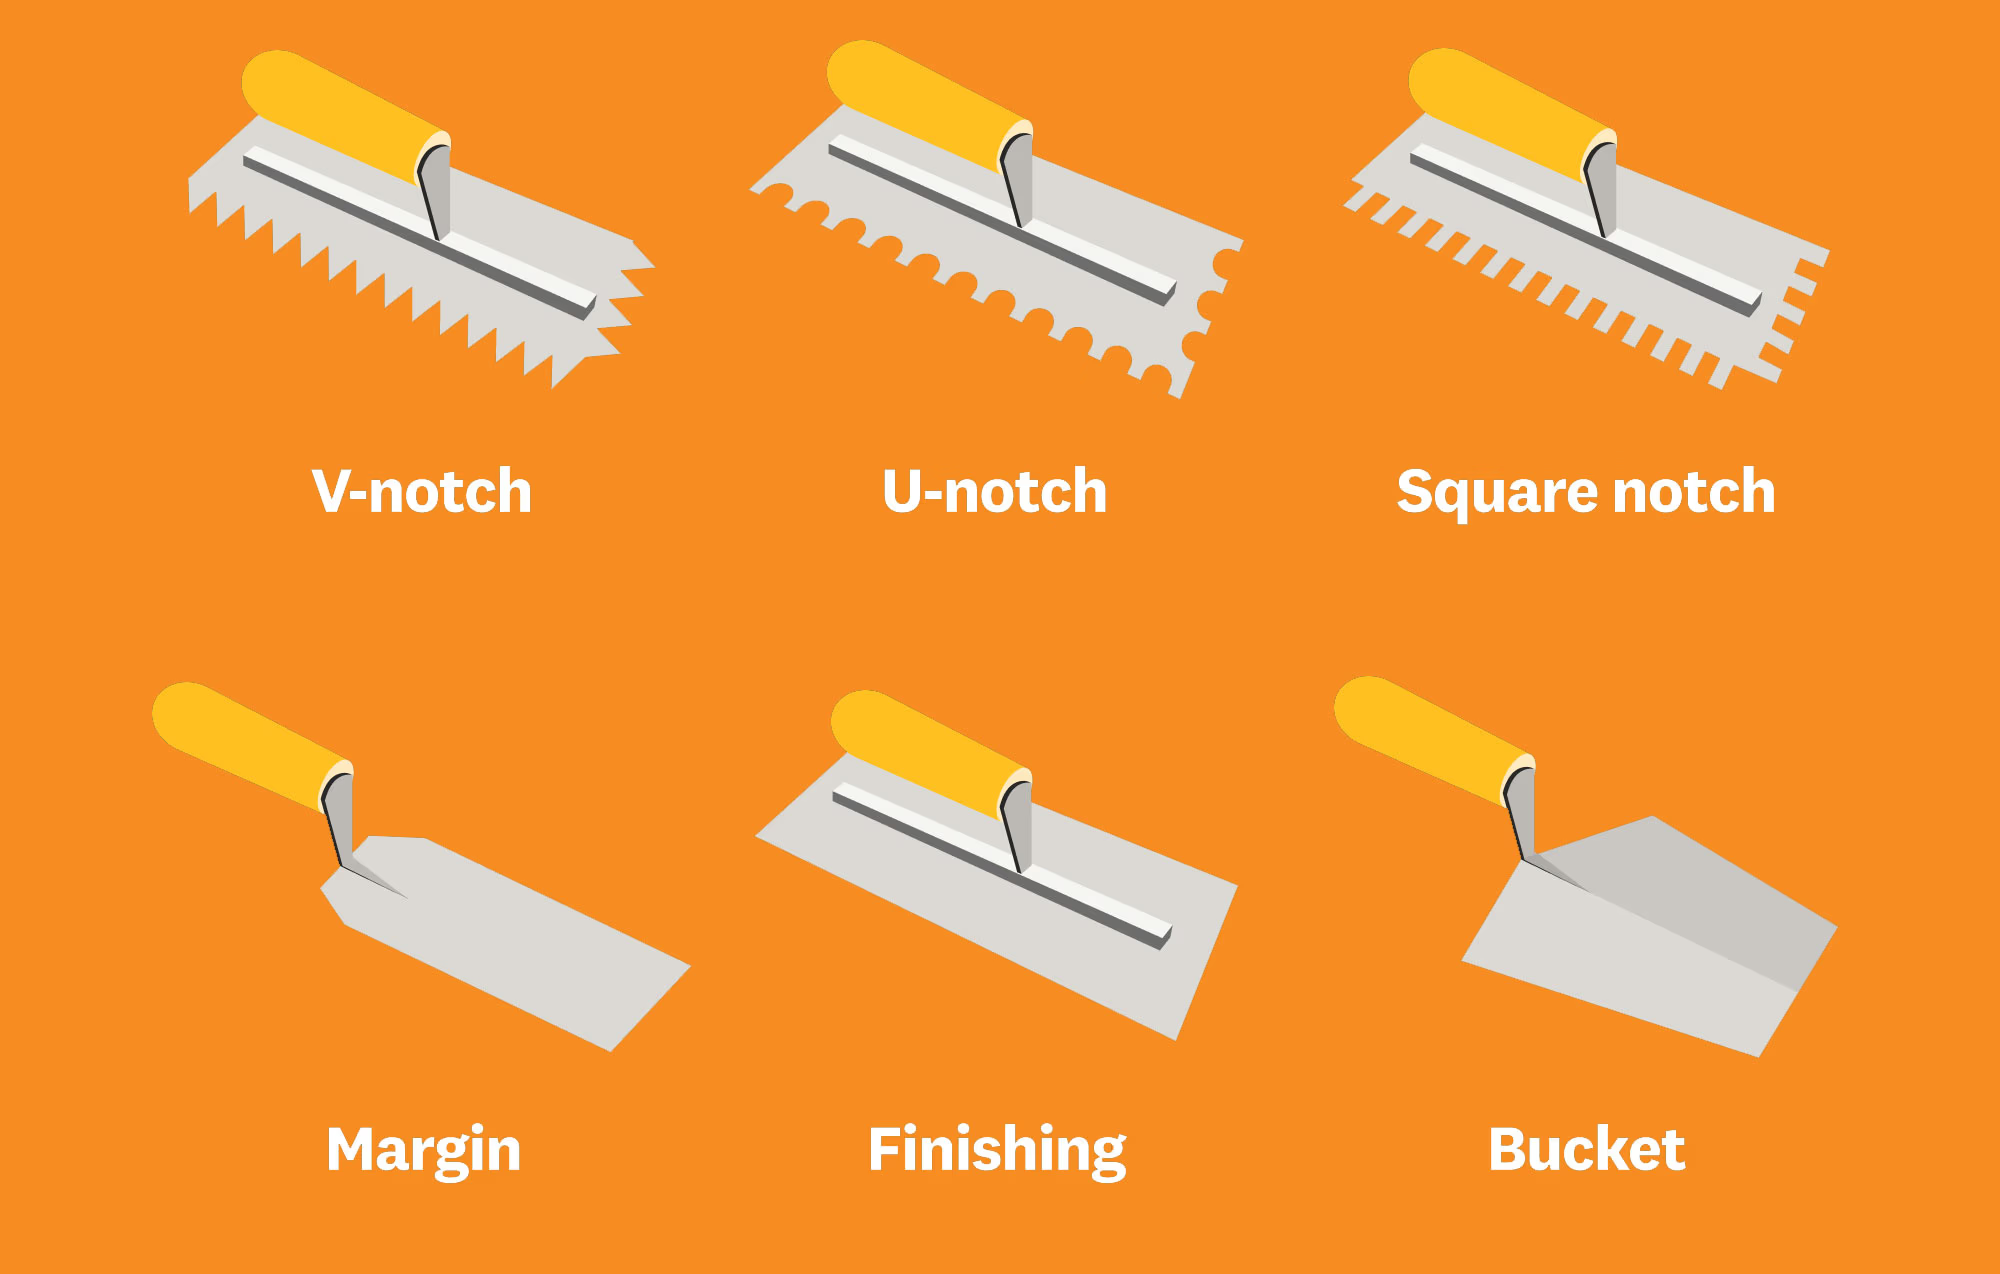
Tile installation relies on three main notch shapes that serve different purposes. Square-notched trowels create neat rows of ridges with flat tops that work best for floor tiles and larger formats. U-notched trowels form rounded ridges that spread mortar evenly and excel in wall applications. V-notched trowels, with their sawtooth pattern, distribute mortar precisely for smaller tiles and detailed work.

Impact of Trowel Size on Installation
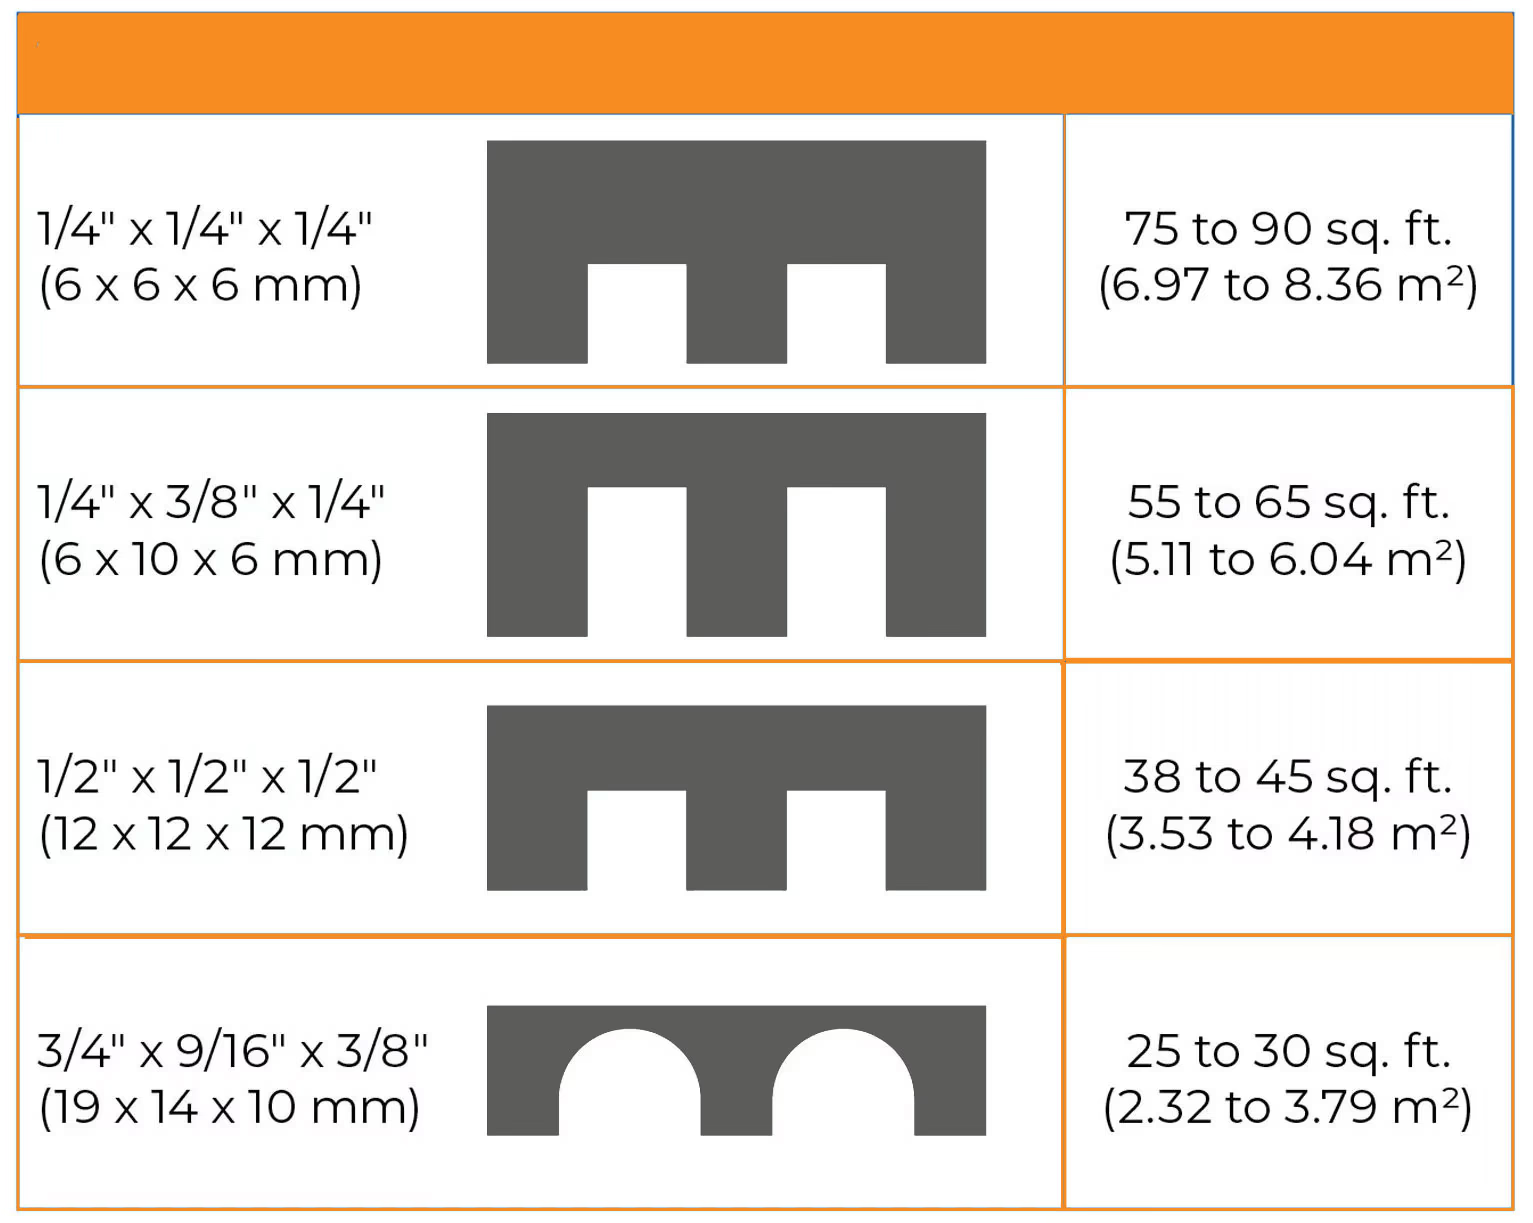
Trowel notch size substantially affects mortar distribution and coverage. A 1/2" x 1/2" square-notched trowel creates a 1/4" mortar bed beneath the tile. U-notched trowels leave a mortar bed slightly over 1/3 the size of their teeth, which affects the tile's final height.
Key Components of a Tiling Trowel
Everything in a professional tiling trowel includes:
Component | Function |
|---|---|
Notch Width | Controls mortar ridge spacing |
Notch Depth | Determines mortar thickness |
Blade Edge | Creates original mortar bond |
The trowel's first measurement shows the width between teeth, while the second number indicates the notch depth. These measurements determine the mortar amount that stays between the tile and substrate after installation.
Complete Trowel Size Chart by Tile Type
The right trowel size will give you optimal mortar coverage for different tile formats. Let's look at what you just need for various tile types and their installation surfaces.

Floor Tile Trowel Size Requirements
Floor tiles just need extra attention when picking a trowel because of heavy foot traffic. A 1/4 x 3/8-inch square or U-notch trowel works well for tiles up to 8x8 inches. We used larger format floor tiles like 12x12 inches with a 1/4 x 1/2-inch U-notch trowel. Here's a quick guide to trowel sizes for floor tiles:
Tile Size | Recommended Trowel Size |
|---|---|
Up to 8x8" | 1/4 x 3/8" Square/U-notch |
12x12" | 1/4 x 1/2" U-notch |
16x16" and larger | 1/2 x 1/2" Square/U-notch |
Wall Tile Trowel Size Guidelines
Wall tiles work best with thinner mortar than floor tiles. A 3/16 to 1/4-inch V-notch trowel works great for tiles up to 4-1/2 inches. Medium-sized wall tiles between 4-8 inches pair well with a 1/4 x 1/4-inch U or square notch trowel.
Mosaic and Specialty Tile Considerations
Mosaic tiles and specialty formats need special care when choosing a trowel. You'll want a 3/16 x 5/32-inch V-notch trowel for mosaic tiles up to 2x2 inches. Irregular or lug-backed tiles like Saltillo pavers work best with a 3/4 x 5/8-inch U-notch trowel that handles their uneven surfaces.
The mortar bed thickness changes based on your trowel choice:
- A 1/2 x 1/2-inch square notch creates a 1/4-inch mortar bed
- U-notched trowels leave approximately 1/3 of their notch size in mortar thickness
Surface and Material Compatibility
Successful tile installation relies on proper substrate preparation and material compatibility. Surface conditions, mortar types, and environmental factors work together to affect trowel selection and installation outcomes.
Substrate Requirements and Preparation
Surface preparation needs precise attention to flatness tolerances. Tiles measuring less than 15 inches on any side must meet a maximum substrate variation of 1/4" in 10 feet. Larger tiles measuring 15 inches or more require a tighter tolerance of 1/8" in 10 feet. The substrate must be:
Surface Condition | Requirement |
|---|---|
Structural Soundness | Must support direct tensile bond >175 psi |
Moisture Content | 28 days cured minimum |
Surface Profile | Wood-floated or broom-finished |
Cleanliness | Free of contaminants and residues |
Mortar Type and Trowel Size Relationship
Mortar type substantially affects trowel selection. Polymer-modified mortars need specific notch configurations to achieve proper coverage. The mortar bed thickness varies based on installation type:
- Thin-bed adhesive installations: 5mm maximum variation over 3m
- Thick-bed adhesive applications: 10mm maximum variation over 3m
Environmental Factors Affecting Trowel Choice
Temperature and humidity without doubt affect mortar performance and trowel selection. Substrate and ambient temperatures must stay between 50°F and 95°F (10°C and 35°C) during installation and for at least 7 days after completion.
Your installation environment must have:
- Protection against drafts during installation
- Minimum 72-hour protection after completion
- Proper ventilation while maintaining temperature control
- Careful attention to substrate moisture absorption rates
Professional Installation Techniques
You need precise attention to trowel handling and mortar application methods to become skilled at professional tile installation.
Proper Trowel Angle and Pressure
The right trowel angle is a vital part of getting optimal mortar coverage. We used a 45-degree angle to the substrate. This angle will give a consistent mortar ridge height and proper distribution. Your angle should stay the same when you reach across horizontal surfaces to prevent:
Common Issues | Effect |
|---|---|
Lower Angle | Not enough mortar coverage |
Higher Angle | Too much mortar on one side |
Inconsistent Angle | Uneven tile lippage |
Coverage Testing Methods
The quickest way to check mortar coverage is by lifting tiles during installation. You need:
- 80% coverage for interior dry areas
- 95% coverage for wet areas and exterior installations
Install the tile as planned and remove it carefully to check coverage. The mortar should look like a choppy ocean surface without visible trowel lines. If coverage isn't enough, you'll need to adjust the trowel size or check the mortar consistency.
Back-Buttering Requirements
Some installations need back-buttering. This technique uses the trowel's flat side to apply a thin mortar layer on the tile's back. You'll need to back-butter:
- Large format tiles
- Natural stone installations
- Porcelain tiles with absorption rates of 0.5% or less
Back-buttering improves bond strength by filling the tile backing's voids and creating a flat plane. But back-buttering alone won't guarantee enough coverage - you still need proper trowel technique and mortar consistency to achieve required coverage percentages.
Troubleshooting Common Issues
Systematic troubleshooting and precise solutions help resolve installation challenges. Let's look at common issues and how to fix them.
Insufficient Mortar Coverage Solutions
The ANSI A108 requirement states clear guidelines for mortar coverage:
Area Type | Required Coverage | Testing Method |
|---|---|---|
Dry Areas | 80% minimum | Remove tile within 10 minutes |
Wet Areas | 95% minimum | Check corners and edges |
Exterior | 95% minimum | Verify full contact |
These solutions ensure proper coverage:
- Use the flat side of trowel to key mortar into the substrate
- Keep a consistent 45-degree trowel angle
- Remove tiles periodically to check coverage
Lippage Prevention Strategies
Improper tile offset patterns often cause lippage issues. Tiles larger than 15 inches need offset not exceeding 33% to minimize lippage risks. These prevention techniques work well:
- Straight stack patterns minimize lippage
- Large formats need 33% offset reverse patterns
- Stairstep patterns maintain consistent levels
Adjusting Trowel Size for Uneven Surfaces
Uneven substrates need specific trowel adjustments. Substrate variations should stay within:
- 1/8 inch in 10 feet for tiles larger than 15 inches
- 1/4 inch in 10 feet for smaller formats
Challenging surfaces require:
- Larger notch sizes compensate for minor variations
- Self-leveling compounds fix significant unevenness
- Back-buttering tiles helps with substrate irregularities
Environmental conditions affect mortar performance. Temperature changes between 50°F and 95°F need adjustments in trowel selection and application techniques. All the same, note that proper substrate preparation is fundamental - no trowel size fixes severely uneven surfaces.
How to Use the Trowel Correctly
The life-blood of successful tile installation lies in mastering proper troweling techniques. Mix the mortar until it reaches a peanut butter-like consistency. Use a trowel instead of a drill to avoid introducing air. Clean the substrate with a damp sponge before spreading mortar to ensure good adhesion.
These steps will help you apply mortar correctly:
- Use the trowel's flat side with firm pressure to key in the mortar and create a mechanical bond
- Keep the trowel at precisely 45 degrees to the substrate
- Add more mortar and comb it in straight lines in one direction
- Better air release happens when you arrange trowel ridges with the short side of rectangular tiles
Mortar consistency affects installation success by a lot. These parameters are vital:
Mortar State | Action Required |
|---|---|
Too Dry | Verify water ratio per manufacturer specs |
Too Wet | Allow 10-minute rest period |
Properly Mixed | Peanut butter consistency without air bubbles |
Place the tile after spreading mortar and move it back and forth perpendicular to the trowel ridges. This movement helps collapse the ridges into valleys, which eliminates voids and ensures proper coverage. We avoided these common mistakes:
- Spot bonding with mortar
- Swirling the mortar in circular patterns
- Twisting tiles during placement
Larger format tiles need back-buttering. Apply an even coat of mortar to the tile's back with the flat side of your trowel. You can also move the tile about one inch in each direction during setting - this distance should match your trowel notch's width.
Check your work by removing a freshly-placed tile occasionally. The mortar ridges should collapse fully without leaving voids on the tile back or substrate. This testing becomes vital especially when you have wet areas that require 95% coverage.
Conclusion
The right trowel selection is the life-blood of successful tile installation. This piece explores everything in trowel selection and usage, from simple notch patterns to advanced installation techniques.
Here's a look at the coverage requirements that will give lasting installations:
Installation Area | Required Coverage | Key Considerations |
|---|---|---|
Dry Areas | 85% minimum | Regular coverage testing |
Wet Areas | 95% minimum | Back-buttering recommended |
Exterior | 95% minimum | Environmental factors |
The success of professional installation relies on three critical factors:
- Correct trowel size selection based on tile format
- Proper substrate preparation and compatibility
- Consistent application technique at 45-degree angles
Note that substrate variations should not exceed 1/8 inch per 10 feet for large-format tiles, while all but one of these formats allow up to 1/4 inch variation. This attention to detail, along with the right trowel selection, will give optimal mortar coverage and prevents common issues like lippage or insufficient bonding.
This knowledge about trowel sizes, notch patterns, and installation techniques will help you tackle your next tile project confidently. The right tools and their proper application are the foundations of successful tile installation.
FAQs about Tile Trowel Size Chart
Q1. How do I determine the correct trowel size for my tile project?
The trowel size depends on the tile dimensions. For tiles 4-8 inches, use a 1/4-inch square-notch trowel. For 8-16 inch tiles, opt for a 1/4 x 3/8-inch square or U-notch. Tiles 16 inches and larger require a 1/2 x 1/2-inch square or U-notch trowel.
Q2. What trowel size is recommended for large format tiles like 24x24 inches?
For 24x24 inch tiles, a 1/2 x 1/2-inch square-notch trowel is generally suitable. However, if the tile is relatively flat with minimal warping, a 3/8-inch square-notch trowel may provide adequate coverage. Always check manufacturer recommendations for specific tile types.
Q3. What are the consequences of using an incorrect trowel size?
Using the wrong trowel size can lead to insufficient adhesive coverage, resulting in weak bonds between the tile and substrate. This can cause tiles to loosen over time, compromising the integrity and longevity of the installation.
Q4. What's the proper trowel size for 8x8 floor tiles?
For 8x8 floor tiles, a 1/4 x 3/8-inch square or U-notch trowel is typically recommended. This size provides adequate mortar coverage for proper adhesion while accommodating the tile dimensions.
Q5. How does trowel size affect mortar coverage in tile installation?
Trowel size directly impacts mortar coverage. Larger notches create thicker mortar beds, while smaller notches result in thinner layers. The goal is to achieve 80-85% coverage in dry areas and 95% in wet areas or exterior installations. Proper trowel size selection ensures optimal mortar distribution for secure tile bonding.


