Are you wondering how to achieve a level and visually appealing tile floor? The key lies in choosing the right tile underlayment and adhering to proper installation techniques.
Don't worry, as this guide provides a comprehensive overview of tile underlayment. Even if you're a beginner, you can attain a beautiful and durable tile installation.
So, let's start by understanding what tile underlayment is and dive into this detailed guide.
What is a Tile Underlayment?
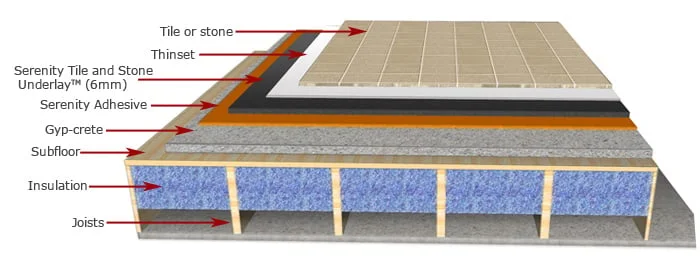
Tile flooring can be simply understood as consisting of 3 components: the tiles, the tile underlayment, and the subfloor. The tile underlayment is what exists to support the tiles, and it is located directly underneath the tiles.
Tile underlayment is a mixture of a solid stabilizing layer and an adhesive, and it doesn't really have a clear definition. Within the tile industry, we can often see products such as Backer board, Mortar beds, Self-leveling underlayments, etc., which would be considered tile underlayment.
Now, I will introduce more detail below, from the historical background of the birth of tile underlayment to the characteristics of all of types.
How did Tile Underlayment come about?
In the past, tilers faced a variety of problems when they are installing tiles. Among the most common problem is how to make the tile flooring keep level.
The height difference between tiles is called Tile Lippage. The tile setters had to fix it by using various methods. Usually, they will use some multiple layers or floor patch products to fill in the spaces until the tile lippage fades away.
But it will waste a lot of time as well as materials. Especially when laying large areas of tile, there is no way to ensure an efficient installation.
For example, an 8" x 8" tile, is a nightmare for all tile installers. If the height difference cannot be accurately controlled within the standard range. Then the whole tile flooring can be said to be substandard.
Tile Lippage Standardized in ANSI A108.02
Tile Type | Tile Size(in.) | Joint Width(in.) | Alllowable Lippage(in.) |
|---|---|---|---|
Glazed Wall/Mosaics | 1×1 to 6×6 | 1/16 to 1/8 | 1/32 |
Quarry | 6×6 to 8×8 | ¼ or greater | 1/16 |
Pressed Floor and Porcelain Tiles | All | 1/16 to less than ¼ | 1/32 |
Pressed Floor and Porcelain Tiles | All | ¼ or greater | 1/16 |
Gauged Porcelain Tiles (GPT) and GPT Panels/Slabs | All | All | 1/32 |
It was at this time that the star of our article, tile underlayment, was born. It became the favorite choice of tile installation workers.
2 Subfloors You Need to Know Before
Concrete Subfloors
Concrete subfloor is very hard and durable, and its extreme stability has become a reason for people to choose it. But it needs a long time to cure, and it may have problems with moisture penetration. Typically, you can't install tile directly over a concrete subfloor.
Wood Subfloors
Because of the stylish style of wood subfloor, it has gained a lot of popularity.
However, it has poor compatibility with tiles. Wood will shrink and expand with changes in temperature, warp and swell with changes in humidity. In the end, it moves too much to be suitable for use with tiles. So you can NOT install tiles directly on the wood subfloors.
How to Choose a Suitable Underlayment for Tile?
After learning some basic knowledge and backgrounds, how should we correctly choose the tile underlayment that suits our needs? The mainstream tile underlayment products on the market comprise approximately 14 types.
However, as mentioned at the beginning, there isn't a clear-cut concept of tile underlayment. With the advancement of technology, the types will continue to increase. To make it easier for you to make your choice, I will categorize them into three major types for explanation. So, let's begin.
Backer Board Underlayments
Since the 1970s, backer board has ben widely used, and it is the industry standard favored by tile installers. It can be installed on walls and floors and is suitable for both wet and dry areas. Backer board comes in rigid panels of 4’ x 8’ and 3’ x 5’, consisting of materials such as cement, fiberglass, and gypsum. Among them, cement backer board has the highest usage rate.
#1 Cement Backer Board
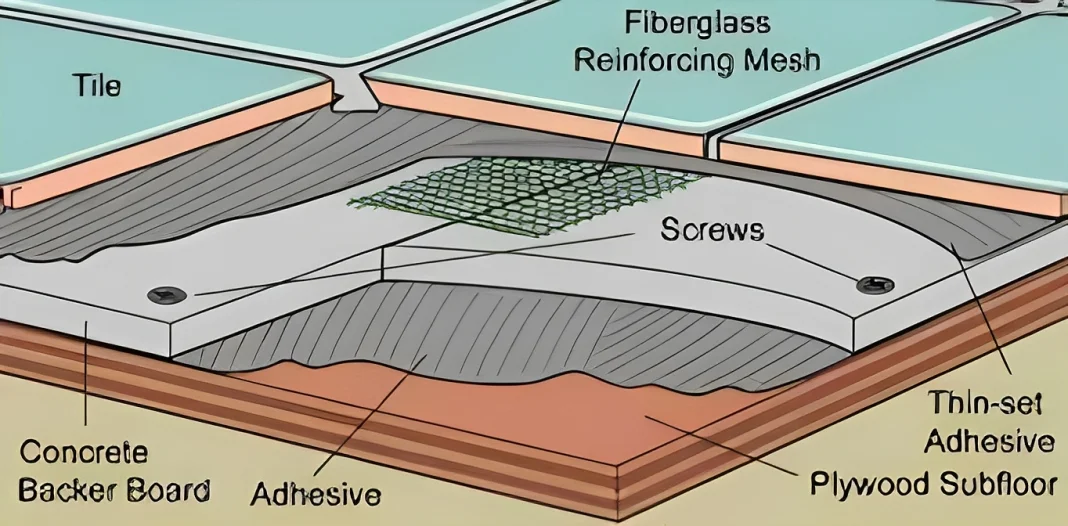
The cement backer board was initially referred to as Concrete Backer Unit or CBU, which is a nailable or screwable backer board or underlayment panel. It conforms to ASTM (American Society for Testing and Materials) C1325. After pressing the cement into panels, the surface is stabilized to form a mesh pattern. This practice helps prevent warping or swelling of the cement backer board when it comes into contact with moisture.
However, its waterproofing is poor. If your area is relatively wet, consider adding an additional waterproofing layer.
PROS:
Mature development: With many years of practical experience, it is a mature product in the market.
Low cost: Cement backer board is an inexpensive product, making it a good choice for cost savings.
CONS:
Heavy Weight: Cement backer board is relatively heavy and can be fragile at the same time.
Poor Waterproofing: Poor waterproofing: Although cement backer board is resistant to water erosion, it does not effectively prevent moisture from penetrating through.
Not conducive to cutting: Cutting cement backer board will generate a significant amount of silica dust (carcinogenic).
#2 Coated Glass Mat Water-Resistant Gypsum Backer Board
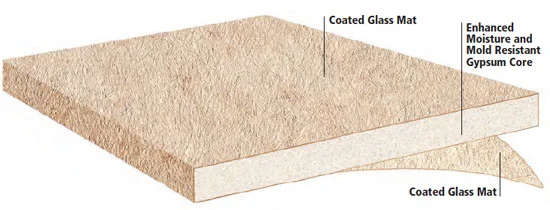
It is a tile backer board composed of treated waterproof gypsum core, conforming to ASTM C1178. Just as the name suggests, it is covered with a coated fiberglass mat on top, making it an excellent choice as a tile substrate in wet areas. It can be used in wet or dry areas on floors, walls, and ceilings, as well as over wood or metal wall studs or wood subfloors.
PROS:
- Good waterproof performance: Due to reinforcement with fiberglass and acrylic coating treatment, its surface forms a moisture-resistant layer. Compared to other materials, you don't need to add an additional full-surface waterproof coating.
- Lightweight: Compared to cement backer board, it is very light in weight.
- Easy to cut: When cutting Coated Glass Mat Water-Resistant Gypsum Backer Board, it won't generate polluting dust. Moreover, you only need to mark the cutting lines and then use cutting tools to easily complete the cutting.
CONS:
- Installation skills required: Fastener heads, field joints, and corners must be properly treated.
- Not low in cost: Typically, its cost is 1.5 times that of cement backer board.
- Thin in thickness: Due to its rigid structure, the thickness of Coated Glass Mat Water-Resistant Gypsum Backer Board is generally thin, for example, 1/2 inch.
#3 Glass Mat Water-Resistant Gypsum Backer Board
Compared to Coated Glass Mat Water-Resistant Gypsum Backer Board, it's just an uncoated version, conforming to ASTM C1658. Its price is slightly lower, but you will need to add an additional waterproof layer by yourself.
#4 Fiber-Cement Backer Board
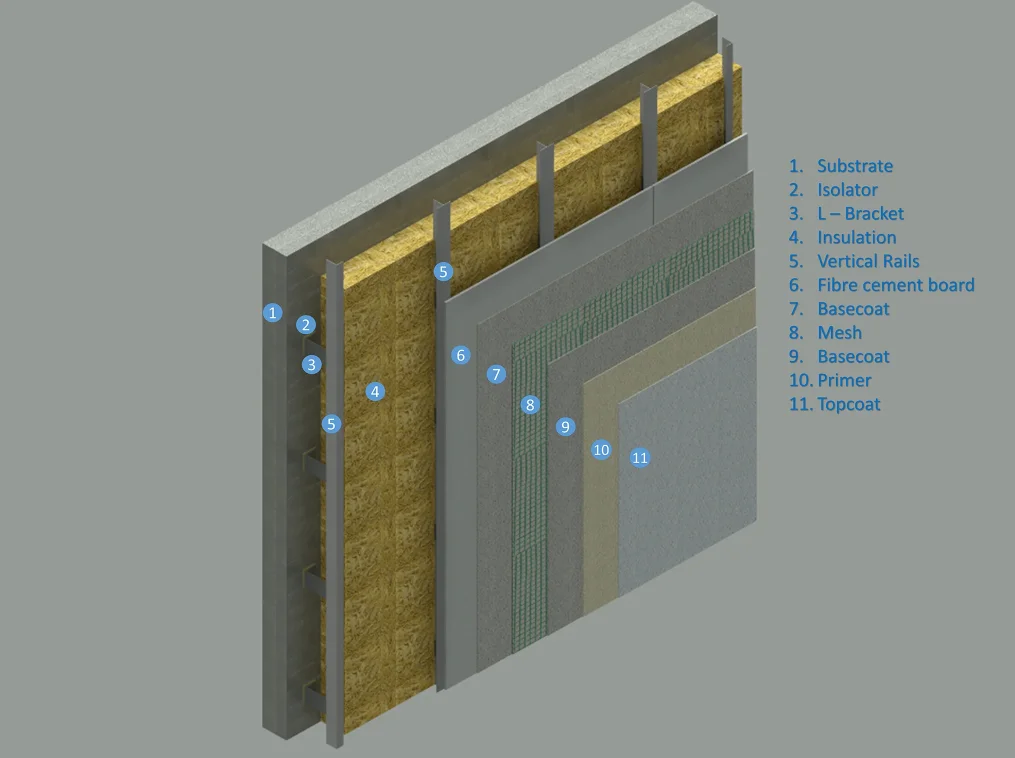
This Tile Backer Board is a new products in the market, conforming to ASTM C1288. It is mainly composed of fibers and cement, combined with the characteristics of these two materials, as well as (water, silica, limestone, and flour).
PROS:
- Durable: Fiber cement backer board exhibits high durability and excellent resistance in various environments. It also has strong corrosion resistance, requiring minimal maintenance even when used in wet areas.
- Waterproof: Fiber cement backer board has natural moisture resistance and can be used on floors, walls, and ceilings in wet areas. If necessary, you can add an additional waterproof coating to enhance its waterproof capabilities.
#5 Fiber-Reinforced Water-Resistant Gypsum Backer Board
This type of gypsum backer board complies with ASTM C1278 standards, demonstrating strong waterproof and mold-resistant properties. It also resists indentation, which can meet the majority of construction requirements. For household use, it is great for installing on a tile backsplash in the kitchen or on a stucco walls.
>> See How to Remove Tile Backsplash
CONS:
It is not as strong as it should be, especially during the construction of new homes.
#6 Cementitious Coated Extruded Foam Backer Board
This is a foam backer board made of waterproof extruded polystyrene foam.
It conforms to ASTM C578. Similar to the fiberglass backer board, it is reinforced on both sides with fiberglass mesh. Some products on the market are coated with polymer resin mortar, significantly improving the bond between thin-set mortar and the tile and backer board, eliminating the risk of delamination of installation layers.
CONS:
Cementitious coated extruded foam backer board is a relatively expensive option, which is why it is rarely chosen by people. While its performance is excellent, there are more cheaper alternatives for general home renovations.
Floor Underlayment Preparation Materials
The following are four types of trowelable and pourable tile underlayments, each with its own optimal uses.
However, regardless of the type, you can achieve a sufficiently smooth surface to accommodate tiles on the floor or walls.
#7 Mortar beds
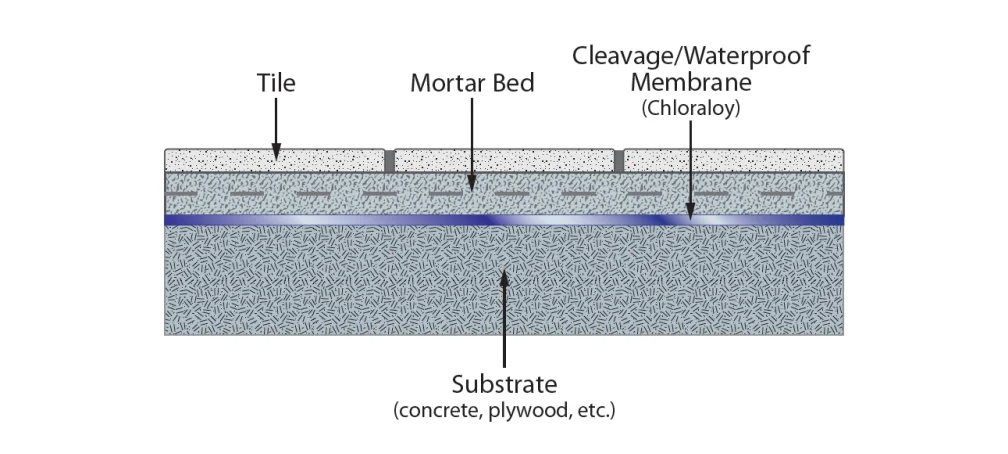
The use of mortar beds has a long history in tile underlayments, surpassing even cement backer boards. People mix dry mortar with water and evenly spread a layer 1 to 2 feet thick on the floor. It can effectively addresses unevenness in floors or walls, eliminating the issue of tile lippage.
CONS:
With the evolution of the industry, the usage of mortar beds has gradually declined. This is primarily due to the lengthy production time of mortar beds, making them unsuitable for tight construction schedules.
Additionally, mortar beds contribute to an increased weight in the floor structure, making it challenging to meet the demands of modern construction.
Meanwhile, achieving a uniform application requires a high level of skill, posing a significant challenge for tile setters.
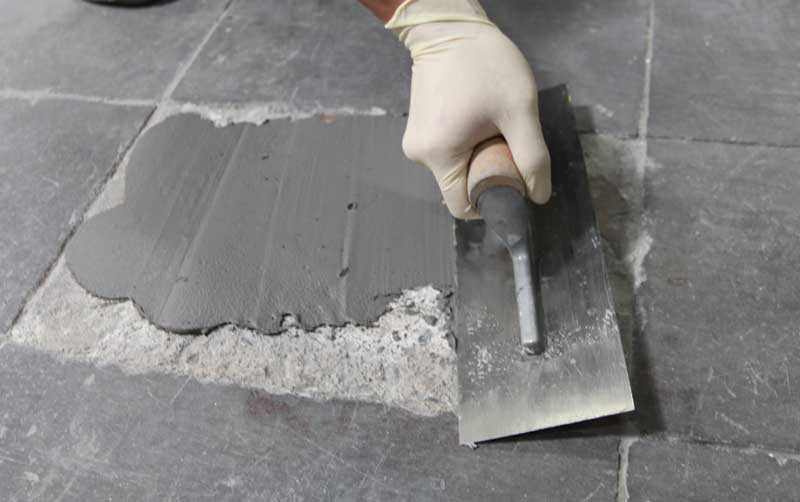
#8 Troweled-On Floor Patch
This is a type of product used to create a smooth surface, typically made of cement, binders, and some polymers.
During usage, it requires the addition of a suitable amount of water, and then it is mixed and applied with a trowel to the areas that need leveling.
It can also be used to repair cracks, gaps, and uneven surfaces on floors or walls.
#9 Trowelable Underlayment
It is a product composed of a mixture of cement and other additives. Sometimes, you may find it frustrating to repair dozens of cracks. Perhaps trowelable underlayment is a good choice for you. It can be used on the backerboard of floors or walls to create a vertical plane for your tiles.
However, for beginners, there may be some difficulties in usage.
#10 Self-Leveling Underlayment
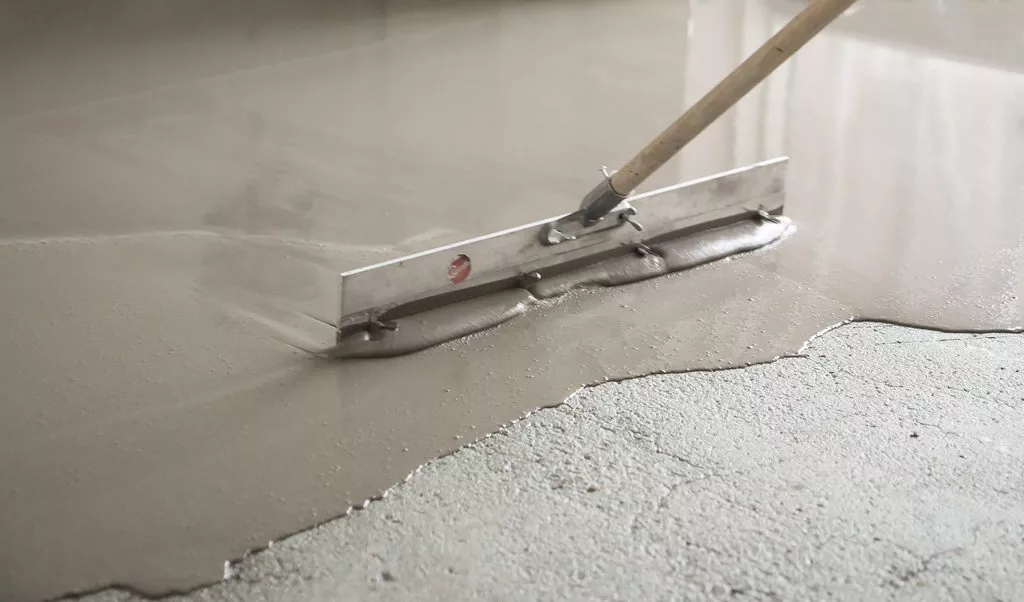
Self-leveling underlayment, also known as Self-Leveling Compound or SLU, is used to easily create a level surface before laying tiles, preventing tile lippage between tiles.
It is a fluid material that spreads to lower areas, achieving a level effect.
After use, it often requires waiting for a day or more to ensure the compound is completely dry.
Tips:
- Please do not add too much water to avoid component separation. Of course, too little is wrong, as insufficient water may affect its flowability, potentially causing some areas to be uneven.
- When mixing, please use an appropriate speed to ensure thorough blending of SLU components.
PROS:
Whether it's a wood subfloor or a concrete subfloor, using SLU can achieve a completely level floor.
CONS:
It can be quite expensive, making it a bit luxurious for the average household. It is more commonly used in large construction projects.
>> See Cheaper Alternative to Self-Leveling Compound
Membranes
Tile underlayment membrane is a new type of product. Similar to the backer board, it is installed between the tiles and the subfloor. The membrane can effectively counteract the stress caused by movement in the subfloor, preventing tiles from loosening or cracking.
Additionally, the underlayment membrane is easier to install compared to a backer board, making it very friendly for people who lack of experience in tiling.
#11 Waterproof Membranes
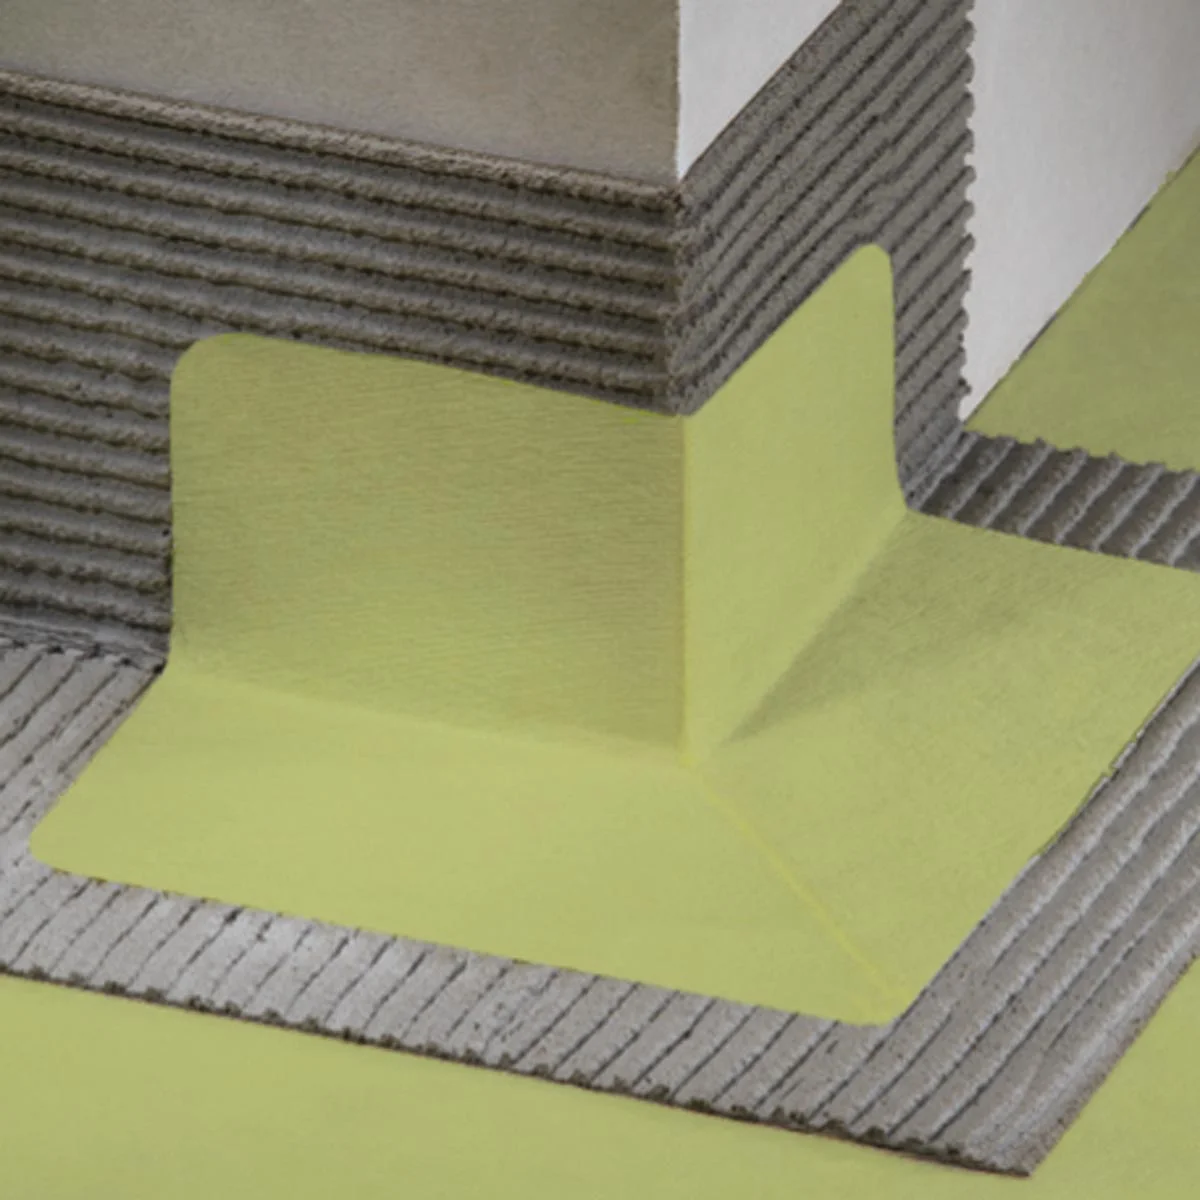
Waterproof Membrane is very common in home waterproofing construction, which is often used in leak-prone areas such as bathrooms, kitchens, and showers. And it also conforms to ANSI (American National Standards Institute) A118.10.
There are various waterproof membranes available on the market, including sheet membranes and some in liquid form.
Absolutely, they are suitable for tile installation in wet areas.
>> See Waterproof Membranes Used in Bathroom Waterproofing
#12 Crack Isolation Membranes
When your concrete subfloor has cracks, and you want to install tiles directly on it, crack isolation membranes would be your first choice. It fully conforms to ANSI A118.12 and is suitable for the installation of thin-set tiles.
Besides, it can isolate the tiles from the cracked subfloor. Like waterproof membranes, crack isolation membranes are available in both sheet and liquid forms.
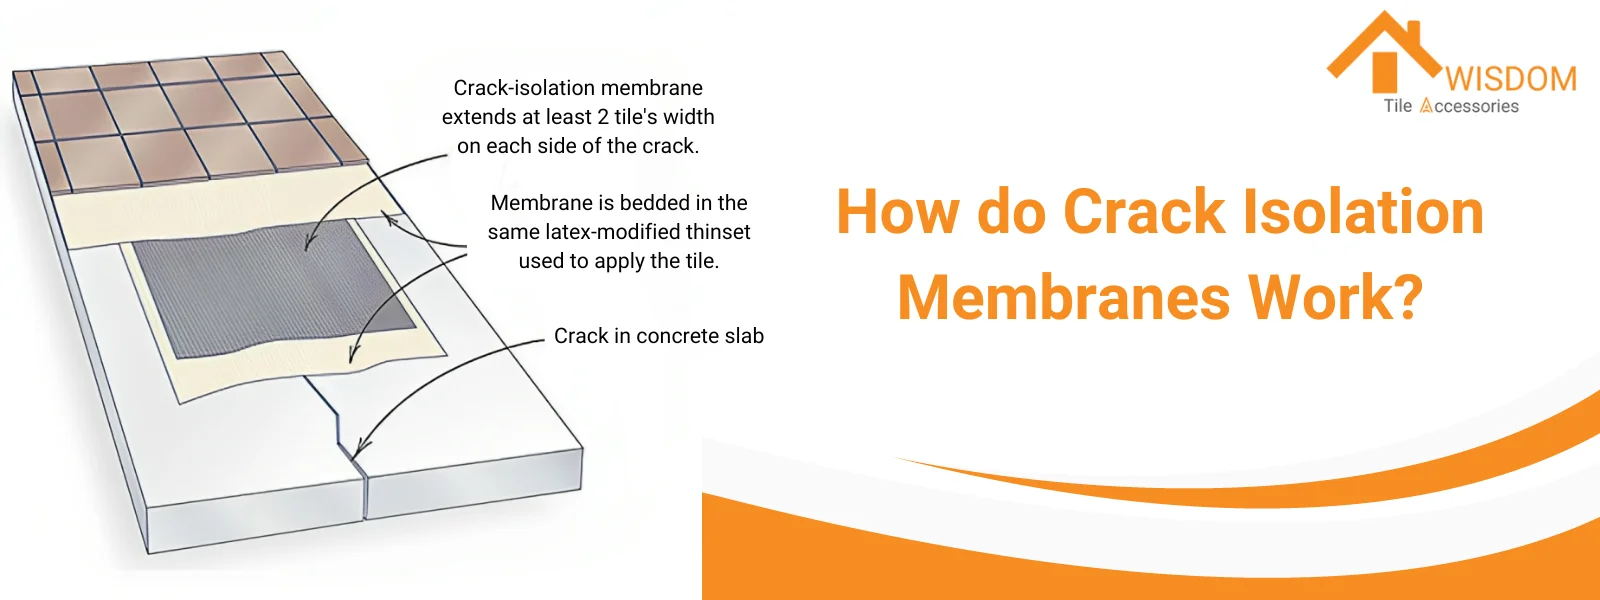
- Crack-Isolation Sheet Membranes
It is easy to install crack-isolation sheet membranes, just use glue to stick it. Unfortunately, it is also relatively expensive.
- CIS Liquid-applied membranes
While the installation process of CIS Liquid-applied membranes is more challenging. Because it tests your ability to evenly spread it on the concrete subfloor.
However, it is very inexpensive, so you may want to consider using it when you need to control costs.
#13 Uncoupling Membranes
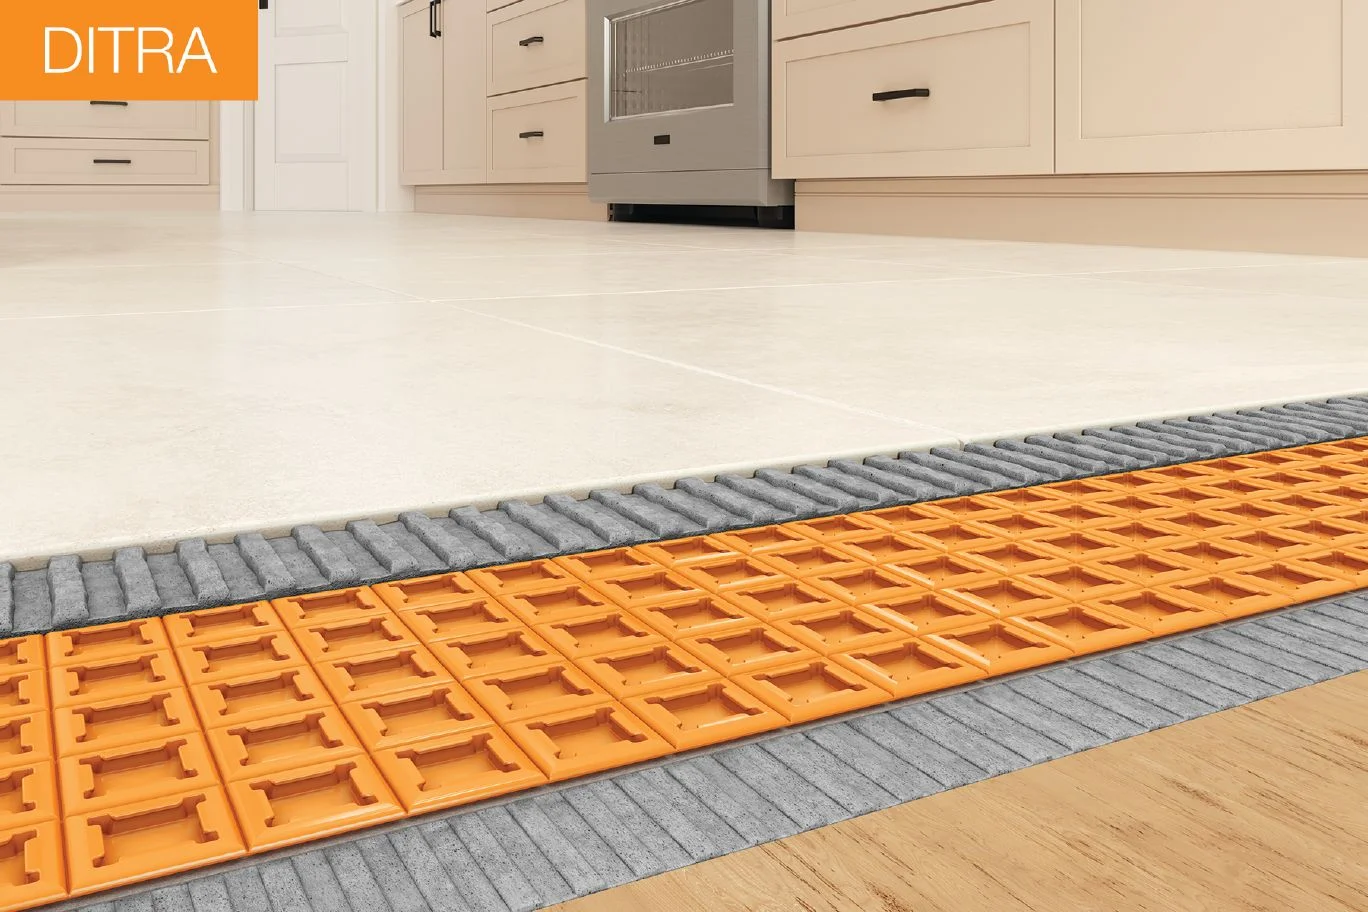
Uncoupling membrane, made of plastic, has replaced the position of cement boards, and its installation method is as simple as that of backer boards. Currently, the most common uncoupling membrane is the Ditra Membrane introduced by Schluter.
>> See What is Uncoupling Membrane & How It Works for Tiles
It is mainly used to limit the stress generated when the substrate moves. The space formed allows independent movement between the tile and the substrate, hence the term "uncoupling”.
The surface of the uncoupling membrane is coated with compounds with a mesh, which enhances the bond between the tile and wood subfloor or concrete subfloor.
By the way, the uncoupling membrane also has some waterproofing properties.
CONS:
There are some limitations to use uncoupling membranes. You can only use them on very stable floors. Otherwise, they will have challenge to support your tile floors.
Moreover, for the same area, uncoupling membranes are more expensive than cement boards.
NOTE:
Uncoupling membranes do NOT have characteristics of ANSI or ISO standards. Only some decoupling membranes on the market meet the requirements of ANSI 118.12 Crack Isolation Membranes.
If you need to install tiles on cracked concrete subfloor, be sure to check whether the purchased uncoupling membrane complies with the ANSI 118.12 standard.
#14 Bonded Sound Reduction Membranes
This is a type of membrane used for sound reduction, effectively reducing vibration noise between floors. It is a generic term for a category of products, and the specific composition depends on the manufacturing methods of various producers.
Typically, bonded sound reduction membranes are directly adhered to the substrate. And then you install the tiles.
Advice: 9 Common Mistakes about Tile Underlayment
- Always follow the manufacturer's instructions and adhere to ANSI standards.
- Use non-corrosive resistant fasteners.
- Use alkali-resistant fiberglass tape to tape the backer board seams instead of drywall tape of drywall compound.
- Do NOT attempt to use thin set to save costs, which is a practice that does NOT comply with the standards. Please don't create more potential problems just to save a moment's cost.
- Do NOT install tiles directly on wooden boards. The expansion and contraction of the wood will cause the tiles to crack.
- Before pouring the self-leveling tile underlayment, be sure to tape over any holes and cracks in the wood subfloor to prevent it from seeping in and leaving indentations.
- When cutting backer board, you should use a concrete cutting blade instead of a wood cutting blade.
- When using a membrane as a tile underlayment, pay attention to whether the tape and sealant used meet the manufacturer's requirements. Avoid potential issues due to incompatibility.
- If you are attempting to use cork as an underlayment for tile, please make sure that the cork used is a mixture of pure cork granules and polyurethane binder. The thickness should be 1/2 inch, and the density should be between 111.8 to 13.6 pounds per cubic foot.
Now, do you have the answers you need? Whatever your requirements, be sure to follow the specified installation methods. This tile underlayment guide concludes here, and if you have any further knowledge you'd like to explore, feel free to reach out to us anytime.
Frequently Asked Questions about Tile Underlayment
What is the best underlayment for tile floors?
This is not a one and done solution. Sometimes, you may even need to use several types of tile underlayment products in combination, such as waterproofing membrane and self leveling compound.
It depends on your specific needs, and following the manufacturer's instructions and ANSI standards during installation is the best practice.
How much to replace underlayment on tile roof?
It depends on what product you choose and the area of your floor. For example, The DURAL Durabase XPS is priced at approximately $3.20 per square foot. The LevelQuik RS 50 lb. Indoor/Outdoor Self-Leveling Underlayment is priced at about $37.00 per 50 lb. The ProFlex Peel and Stick Crack Isolation 40-Mil Underlayment is priced at $1.21 per square foot.


