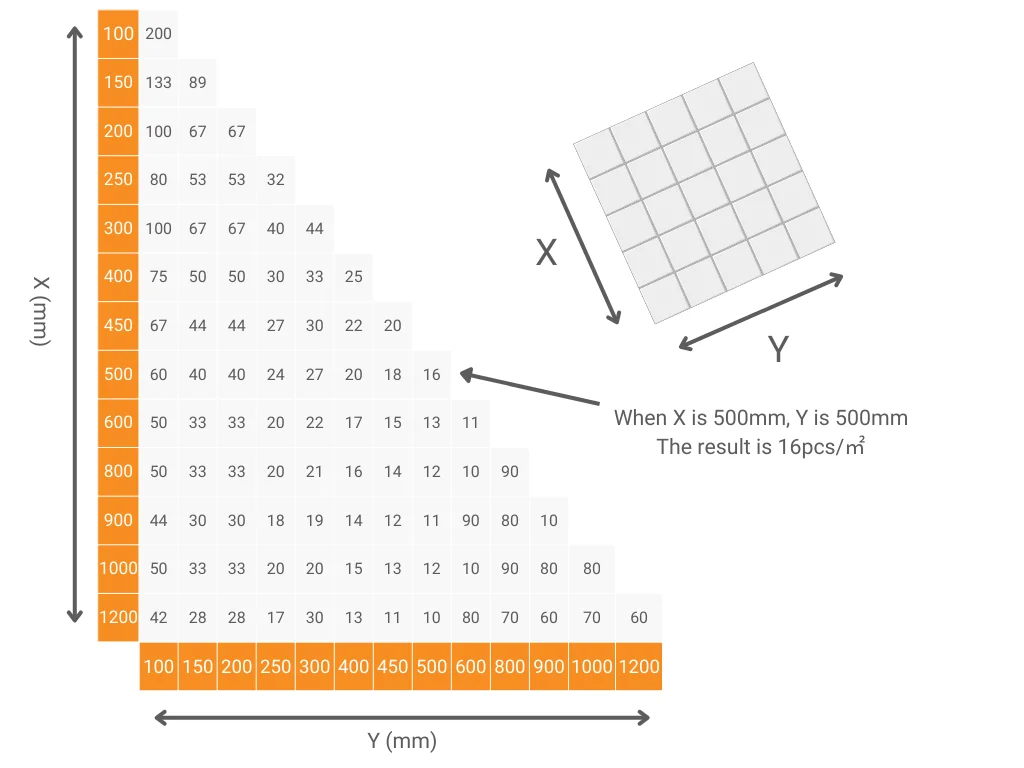
You are planning a tile project, budget in hand, and need to know how many leveling clips per tile to purchase. The simple answer is four, but applying that math to modern large format planks is a direct path to lippage. These clips are your primary defense against the inherent bow in long tiles. Using the wrong quantity means a failed installation. This guide provides the professional rules for determining the right amount, ensuring your investment results in a perfectly flat surface, not a source of regret.

What Is the Basic Rule for Placing Clips?
For any standard tile, the process begins with a simple, foundational rule: one clip on each side. This is the starting point for all calculations.
The placement of these clips, however, is not arbitrary. Each clip should be positioned approximately 2 to 4 inches (5 to 10 cm) from the corner of the tile. This specific placement creates the most effective leverage. It provides firm, even pressure to control the corners, which are the most common points where one tile edge can sit higher or lower than its neighbor. Placing the clip too close to the corner risks chipping the tile during removal; placing it too far in leaves the corner itself unsupported and free to dip. This 2-to-4-inch zone is the professional's sweet spot for control.

How Many Clips for Large Format and Plank Tiles?
The basic rule changes completely when you work with modern large format tiles (LFT), which are generally any tile with one side longer than 15 inches. For these tiles, the number of clips required is dictated by a challenge that smaller tiles do not have: an inherent, slight bowing or "cup" along their length.
This is not a defect; it is a physical reality of the manufacturing process. Failing to account for this bow is the most common reason for failure with LFT installations. If you only place clips at the corners of a long plank, the bowed center will not have enough pressure to flatten into the mortar. The result is classic lippage right in the middle of the tile.
To counteract this, you must follow a professional rule of thumb: use at least one clip for every 12 inches (30 cm) of the tile's length.
These additional clips are not optional. They apply the necessary, targeted downward pressure along the tile's length, forcing the bowed center down flat into the mortar bed and holding it there securely while the adhesive cures. To make this clear, here is a quick reference guide for common LFT sizes.
Quick Guide: Recommended Clips by Tile Size
Tile Size (inches) | Clips per Long Edge | Total per Tile* | Key Consideration |
|---|---|---|---|
12" x 24" | 2 | 6 | Manage potential center bowing. |
24" x 24" | 2 (on all sides) | 8 | Increased weight is a factor. |
9" x 36" | 3 | 8 | Bowing is a major concern. |
24" x 48" | 3 to 4 | 10 to 12 | Maximum control needed. |
* Total per tile assumes no shared clips with adjacent tiles and is for estimation only.
Do Warped or Bowed Tiles Need More Clips?
Yes, absolutely. A visibly warped or bowed tile requires more clips than a perfectly flat one. This is not a matter of opinion, but of physics. Attempting to install a bowed tile with the standard number of clips is a common and costly error.
The key is not just adding more clips randomly, but placing them with purpose. You must strategically position extra clips directly at the highest point of the bow. This is where the tile is lifting away from the substrate, and it is precisely where you need to apply targeted, downward pressure. These additional clips act as clamps, forcing the high point of the tile down into the mortar bed and holding it flat while the adhesive cures. Ignoring the bow and using a standard layout guarantees that the center of the tile will not fully bond, resulting in a hollow spot and noticeable lippage.
How to Place Clips in Special Patterns
When you move beyond a simple grid, the rules for clip placement become more complex. Layouts like herringbone or offset (brick) patterns create a unique challenge that must be addressed.
The issue arises at the "T-junctions". In a grid, all corners meet at a four-way intersection. In an offset pattern, the end of one tile meets the continuous edge of two other tiles, forming a "T". At this single point, you have three different tile corners that all need to be perfectly flush. If a clip is placed incorrectly, you can control lippage between two of the tiles, but the third one will be left uncontrolled, creating a tiny but noticeable step.
The solution is to ensure careful, deliberate clip placement around these T-junctions. This often means using T-shaped clips designed for this purpose, or strategically placing standard clips on either side of the junction to triangulate the pressure and control all three tiles simultaneously.
Common Mistakes in Clip Placement
The most persistent lippage issues can almost always be traced back to a few common mistakes in how clips are used. Understanding these errors is key to preventing them.
- Using Too Few Clips: The most obvious mistake. On a large tile, this results in the center sagging away from the adhesive, creating a weak, hollow bond and a visible lip.
- Placing Clips Too Far From Corners: When clips are positioned too far from the corners (more than 4 inches), the corners themselves are left without support. They are free to sink into the mortar or sit slightly proud, defeating the system's primary purpose.
- Ignoring Tile Warpage: Treating a bowed tile like a perfectly flat one guarantees failure. The standard clip quantity will not be enough to counteract the bow, leading to lippage in the tile's center.
- "Fixing" an Un-flat Floor: This is the most critical and dangerous mistake. A leveling system is designed to prevent lippage between adjacent tiles on an already flat surface. It is not designed to fix a dip or hump in the subfloor. Using the clips to "pull up" a tile over a low spot creates a hollow void underneath it. This tile is not bonded to the substrate and will inevitably crack under normal foot traffic. Always fix the subfloor first.
Is It Possible to Use Too Many Clips? Finding the Right Balance
While using too few clips is a major problem, it is also possible to use an excessive amount. More clips do not always equal a better result. Over-crowding the joints with too many clips can make them difficult to clean and can interfere with achieving a full, strong grout line. The goal is not to use the maximum number of clips possible, but to use the correct number, placed strategically to provide even and adequate support. Follow the professional guidelines, and trust the process.
How to Calculate Total Clips for a Project
After understanding the rules for placing clips on a single tile, the next logical step is to calculate the total quantity needed for your entire project. This is where many people make a critical miscalculation. They simply determine the number of tiles needed for their area and multiply that by the number of clips per tile. This approach is incorrect and will always result in buying far more clips than you actually need.
The "Shared Clip" Principle
The reason for this discrepancy is a simple but fundamental concept: the shared clip. In any tile installation, a single clip placed on the edge between two tiles serves both of them simultaneously. A clip at a corner intersection can even serve up to four tiles at once in a grid pattern.
Therefore, you cannot calculate your total based on a "per tile" number in isolation. You must account for the fact that every interior tile in your layout will share all of its clips with its neighbors. Only the tiles along the outermost perimeter of the installation will have clips that are not shared on one or two of their sides.

Why Manual Calculation is Difficult
Attempting to calculate the total quantity by hand is exceptionally difficult and prone to error. To do it accurately, you would need to:
- Create a complete diagram of your tile layout.
- Account for the specific dimensions of your tiles.
- Factor in the exact layout pattern (grid, offset, herringbone).
- Manually count the number of shared and non-shared clips across the entire area.
- Make adjustments for any cut tiles along walls or around obstacles.
This process is not only tedious but also impractical for any project larger than a small closet. A single miscalculation can leave you short of clips midway through your job or with hundreds of unnecessary clips left over.
The Best Solution: A Professional Calculator
Given the complexity of these variables, the most reliable and efficient way to determine an accurate quantity is to use a tool specifically designed for the task. A professional-grade calculator moves beyond simple multiplication and incorporates the complex logic of real-world layouts.
For a precise quantity tailored to your project, we highly recommend you use our Tile Leveling Clip Calculator.
Our tool automatically accounts for your specific tile dimensions and the total area of your installation, factoring in the "shared clip" principle to provide a realistic and reliable estimate. It eliminates the guesswork and ensures you purchase the right amount of clips for your job, saving you both time and money.
In addition, when purchasing tile leveling clips from us, you can also enjoy our one-stop service, and our experts will complete everything for you.
Conclusion
Here is the final checklist for using the correct number of clips to guarantee a professional result:
- For any tile over 15 inches, always use more than the basic four. Add clips along the long edges to control the natural bow.
- For any visibly warped tile, place an extra clip directly at the highest point of the curve to force it flat.
- For offset or herringbone layouts, pay special attention to securing the "T-junctions" where three tiles meet.
Adhering to these rules is the difference between a flat surface and a failed one.
Frequently Asked Questions
What is the 1/3 offset rule for tile?
The 1/3 offset rule means each row of tiles is shifted by one-third of the tile's length, rather than by half. This layout is highly recommended by tile industry authorities for any tile longer than 15 inches to help minimize visible lippage caused by natural tile bowing.
Can I reuse the tile leveling clips?
No, the clips themselves—the part that sits under the tile—are single-use and designed to break off during removal. However, the wedges or screw-on caps that apply the pressure are reusable. Always collect these reusable parts after breaking off the clips for your next project.
Does the brand of leveling system affect how many clips I need?
Generally, no. The principles of using more clips for larger or bowed tiles apply to all major systems, whether they are wedge or screw-type. The quantity is dictated by the tile, not the brand. However, it is always a good practice to consult the specific manufacturer's recommendations.
How many traditional tile spacers do I need?
While this guide focuses on leveling clips, a common related question involves spacers. The simplest estimate is to multiply your total number of tiles by four, as each tile has four corners. This gives you a safe quantity for purchasing, though the actual number used may be slightly less due to shared corners in the field.


