| Feature | Description |
|---|---|
Title | Beginner Guide: How to Tile Around Kitchen Window |
Summary | This article provides a comprehensive guide for DIY beginner on how to beautify your kitchen by adding tiles around the kitchen window, including tips on selection, installation, and maintenance. |
Keywords | Tile Around Kitchen Window, Kitchen Renovation, Home Improvement, Interior Design |
Author | Home Design Enthusiast |
Reference Link | https://www.houzz.com/ |
Tiling around a kitchen window not only enhances the aesthetic appeal of your space but also protects the walls from moisture and splashes.
Whether you're a novice or looking to refine your skills, this article is your essential resource for mastering the art of tiling around a window.
List of Tools Needed
No. | Purpose | Tools |
|---|---|---|
1 | Cleaning | Cloth, Sponge |
2 | Measuring | Tape Measure, Ruler |
3 | Installation | Scraper, Tile Leveler, TIle Spacers, Tile Trim, Grout |
Professional Tips:
Not sure how many tiles, spacers and clips it will cost?
>> Use Tile Calculator
>> Use Tile Spacer Calculator
>> Use Tile Clips Calculator
Choosing the Right Tiles
Material Matters
- Ceramic and Porcelain: Popular for their durability and range of designs.
- Glass Tiles: Offer a luminous quality, reflecting light to brighten the space.
- Natural Stone: Adds a unique, earthy feel to your kitchen but requires more maintenance.
Color and Pattern
- Complementing vs. Contrasting: Decide whether you want the tiles to blend in with your current decor or stand out as a statement feature.
- Light vs. Dark Shades: Lighter tiles can make the space feel larger and more open, while darker tiles add warmth and depth.
>> See 19 Tile Laying Patterns for Every Style
>> See What are the Best Subway Tile and Grout Color Combinations?
Size and Shape
- Consider the size and shape of the tiles in relation to the window area and overall kitchen size. Mosaic tiles can be a good choice for more intricate designs, while larger tiles offer a sleek, modern look.
Kitchen Window Tiling Installation Process
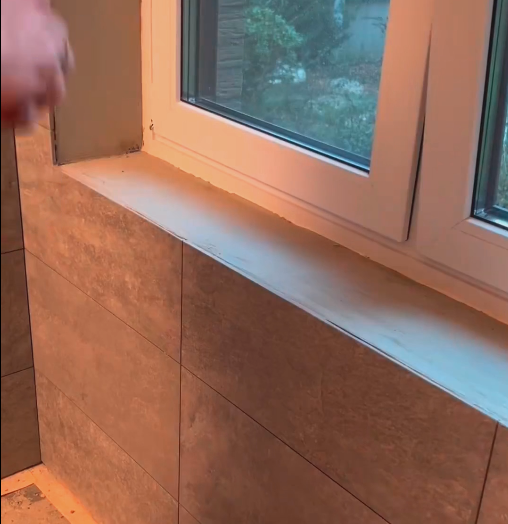
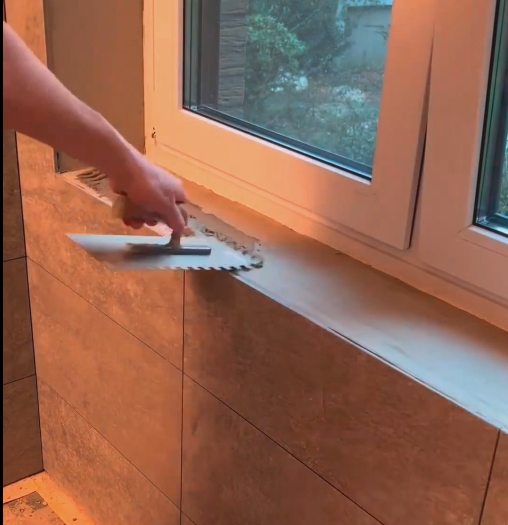
Step 1: Initial Preparation
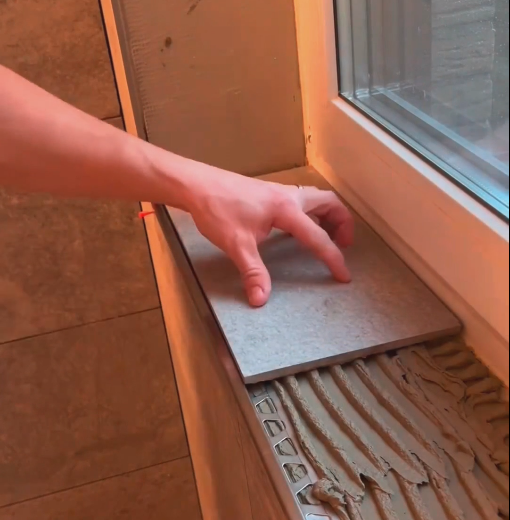
- Clean Surface: Begin by cleaning the flat surface of the window sill thoroughly to ensure it is free of dust, debris, or grease.
- Apply Grout: Spread grout evenly over the cleaned surface to prepare for tile installation.
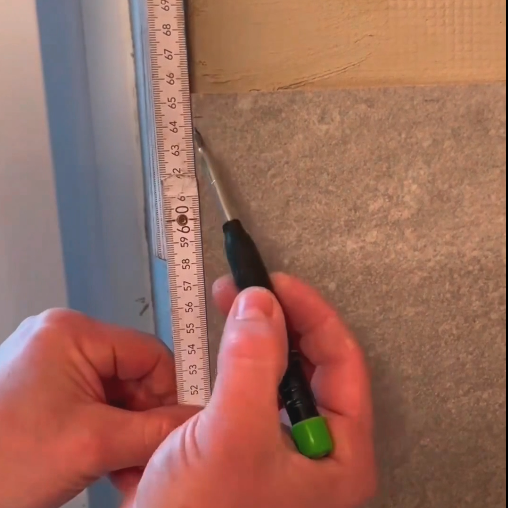
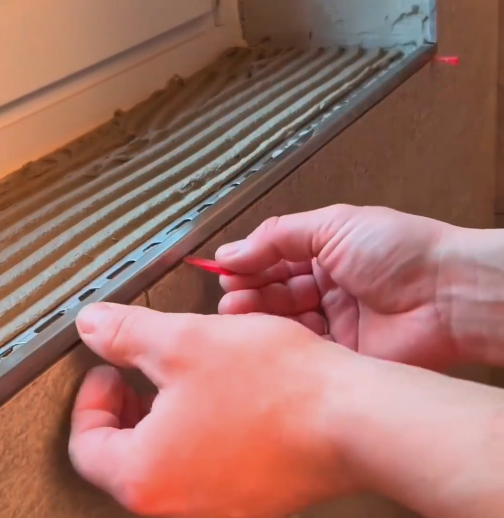
Step 2: Tile Measurement & Trim Installation
- Measure Edge Length: Use a tape measure to accurately determine the length of the edge where tiles will be installed.
- Install Stainless Steel Tile Trim: Fit stainless steel tile trim at the edge for a clean, protective finish.
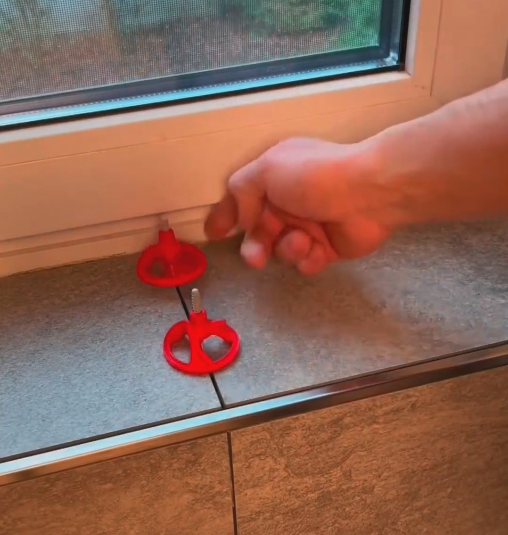
- Insert Tile Spacers: Place tile spacers to ensure uniform gaps between tiles for consistent grouting.
Step 3: Tile Laying & Leveling
- Lay Tiles: Position the tiles on the grouted surface and compact them manually to secure placement.
- Use Tile Leveling System: Employ a tile leveling system to maintain an even tile height across the installation.
Step 4: Securing Tiles
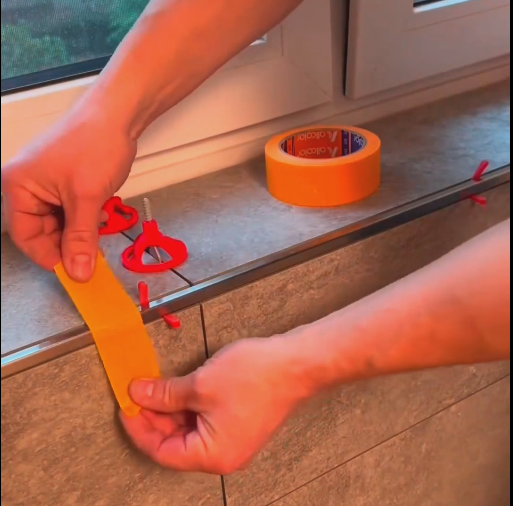
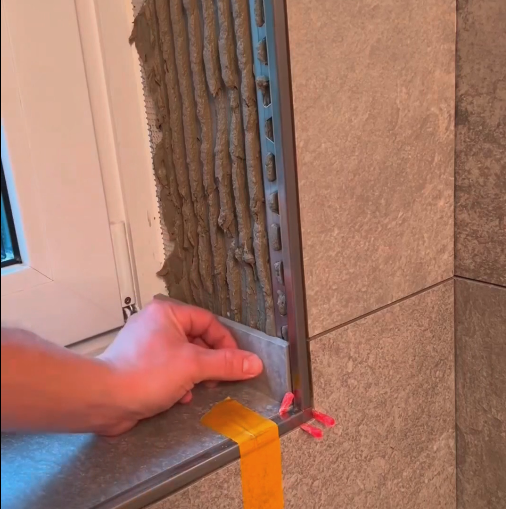
- Tape Outer Corners: Apply tape to the outer corners of the tiled edges to hold the tiles in place as the adhesive sets.
- Repeat on Wall Side: Apply the same installation method to the wall side of the window for a cohesive look.
Step 5: Finalization
- Remove Installation Aids: After the tiles have set, remove the tile leveling system, tile spacers, and tape, completing the installation process.
Need a more detailed installation tutorial?
Watch our video: "How to tile around the window 2024"
FAQ: Tile Around Kitchen Window
Can I tile around a kitchen window myself, or do I need a professional?
While it's possible to DIY, hiring a professional is recommended for complex designs or if you're not confident in your tiling skills.
How do I choose the best tile color for my kitchen?
Consider the color scheme of your kitchen and whether you want the tiles to be a focal point or blend with the existing decor. Using sample tiles against your kitchen window can help you decide.
How often should I reseal natural stone tiles?
Typically, every one to two years, but follow the manufacturer's recommendations and perform regular checks for any signs of wear.
What tile trim to use around a window?
When choosing tile trim for around a window, consider a trim that complements the style and material of your tiles, while ensuring durability and moisture resistance. Metal trims, such as aluminum or stainless steel, offer a sleek and modern look, and are resistant to rust and corrosion. PVC trims are versatile and cost-effective, suitable for various tile types. Ceramic tile trims, matching the tile material, provide a cohesive look. Select a trim that also matches the thickness of your tiles for a seamless installation.
How do you fill a gap between tile and window?
To fill a gap between tile and window, use a high-quality, waterproof caulk or silicone sealant. Clean the area thoroughly, removing any debris or old caulk. Dry the area completely. Apply painter's tape to both the tile and the window frame to ensure straight lines. Cut the tip of the caulk tube at a 45-degree angle, and using a caulking gun, apply the caulk smoothly into the gap. Smooth the caulk line with a wet finger or caulk tool for a neat finish. Remove the painter's tape while the caulk is still wet, and allow it to cure as per the manufacturer's instructions.
Where not to caulk around windows?
When caulking around windows, avoid applying caulk to the weep holes located at the bottom of exterior window frames. These holes are designed to drain away any water that gets inside the window framing, preventing water from accumulating and causing damage. Additionally, do not caulk the movable parts of the window or the space between the window sash and the frame to ensure proper operation and ventilation. Caulking these areas can lead to moisture buildup and make it difficult to open or close the window.


